Producing a Podcast with the Gear You Own Today
Podcasting News, 30 May 2005
 In this exclusive excerpt from Todd Cochrane's book, Podcasting: The Do It Yourself Guide, Todd explains how you can get started with podcasting today, using your computer and gear that you probably already own. A PDF version of this excerpt is also available. The book, part of Wiley's ExtremeTech series, shows readers not only how to find, download, and listen to podcasts, but also how to create a podcast of their own. In this exclusive excerpt from Todd Cochrane's book, Podcasting: The Do It Yourself Guide, Todd explains how you can get started with podcasting today, using your computer and gear that you probably already own. A PDF version of this excerpt is also available. The book, part of Wiley's ExtremeTech series, shows readers not only how to find, download, and listen to podcasts, but also how to create a podcast of their own.
Podcasting News has arranged with the publisher to make this excerpt available, in order to give you an introduction to Todd's book. The ideas and opinions expressed in this article are the author's.
Podcasting: The Do It Yourself Guide: Chapter 5
Producing a Podcast with the Gear You Own Today
I have talked to a lot of people about podcasting, and they are surprised when I talk about the basic podcasting hardware requirements. Most think they need a studio setup, but this couldn't be farther from the truth.
You're probably asking yourself, what do I need to get started today? A computer, a microphone, and a website, along with software that can be downloaded from the Internet. Its really that simple.
In this chapter I will cover the very basic equipment and software that you need to start podcasting almost immediately with the gear you own, today. Remember, I recorded my first podcast in a hotel room using my laptop and a $7.95 headset microphone, along with some software downloaded from the Internet and some that already resided on my computer.
Computer Requirements
If you have purchased a computer within the last two or three years, you probably have a PC that is capable of recording a podcast. This is a general statement; if you have a PC running Windows XP or a Mac running OSX, you should be good to go. Recording audio on PCs has been going on for a long time, and there are many variations in equipment setups in the world today. In the following sections, I cover computer basics for Windows and Mac users.
Windows XP/2000
The majority of the computers in the world are running a Windows operating system.Windows machines today come in many different styles, including laptops, desktops, tablets, mini PCs, and so on. These machines or their components run the gambit in performance .Typically, you would not expect your $399 rebate special to perform at the same level as a $2,000-plus gaming machine. This is not to say the $399 rebate special will not work, but you will have to minimize the number of programs running so as not to interfere with the recording process. Sometimes by simply increasing a computers Random Access Memory (RAM) and not overtasking, you can record a podcast on an entry-level PC.
In recent years most brand-name manufacturers have been selling computers at rock-bottom prices, targeting price-conscious shoppers. I love a good deal just like the next person, and my kids have benefited from these lower-priced PCs, sharing a $399 rebate special between them. I, on the other hand, have always built my own desktop servers, so, being a geek/power user, I typically let performance win over price. If you are concerned your machine may not be up to the task of processing audio efficiently, you will simply have to experiment and see. The only way you will know for certain is by installing the software I recommend here and then seeing how well recording a podcast goes.
I will generalize and say that if you have a Pentium 4 or equivalent processor with 512MB of ram, 3 to 4 GB of available space on your hard drive, and audio ports for line in and line out, you can start podcasting today. Line in and line out refer to where microphone and headphones are connected to your computer.
PC and Mac users have found that from time to time, operating systems do weird things. Even those of you with $3,500 super computers can lose a show before you have saved it to the hard drive during recording or postprocessing. I will thoroughly cover this to help mitigate that risk in Chapter 8.
For Windows users, basic requirements are as follows:
- Windows XP/2000
- Pentium 4 processor
- 512 MB of RAM
- 3 to 4 GB of free space on the hard drive
- Line Out/Line In
Apple
Prior to writing this book, the closest I ever got to a Mac was when I walked by someone with one. Sure, I joked with co-workers who were Mac users and dealt with the typical PC-versus-Mac mindset. In researching materials for this book, I found I could not do the reviews justice unless I had a Mac, so I purchased a Mac Mini. I knew that the Mac Mini, Apples introductory machine, has the lowest possible performance specifications of any machine on the Apple G4 product line. I knew that if I could record a podcast on a Mac Mini, it would probably make the Mac fans happy.
The Mac Mini that I used was the 1.42 GHz machine, with 512 MB of RAM and a USB Griffin iMic microphone and headphones. The iMic can be purchased online at (http://griffintechnology.com) or through any major computer store that carries Apple products.
The Mac Mini does not have a built-in microphone jack, even though it does have a headphone plug, which I did not use. The unit came with 256 MB of RAM, but from the very start, that was not enough. I installed 512 MB, but to have achieved the best performance, I should have installed a 1GB chip.
I used the basic software setup that a beginner user probably would. I did have to purchase one application to upload my first Mac Mini podcasta file transfer protocol (FTP) application. I chose Captain FTP from the Apple software resource list, available at (http://www.captainftp.com) for under $30. I used this program to transfer files to my website.
The biggest disappointment was with the delayed audio feedback through MAC OS X. This is an issue that even users of Powerbooks are finding, because there are latency issues that build up the longer you record.
Audio latency tests with the Mac Mini revealed that as I spoke, I incurred a delay of up to about a second before I would hear feedback (my voice) through the headphones. It was very irritating and distracting. (Appleif youre reading this, you need to fix it.) I hear this as a complaint from almost every Mac podcaster out there.)
To date, I have not heard of any workarounds, but I do have a solutionI recommend that you not listen to the audio feedback. This has some drawbacks, but I personally was beyond irritated with the latency issue. In Chapter 6, I will outline some hardware you can acquire to help avoid this issue.
There is no reason to think that it would not be just as easy to record podcasts on OS 9. The recording software that I explain how to use in Chapter 9 has release versions for OS 9. I personally would consider the Mac Mini with 512 MB of RAM a minimum standard.
Microphone and Headset Requirements
In the next chapter, I will discuss the extreme importance of choosing a professional microphone. Those of you wishing to build a semi-professional studio will need to take some time and make an informed decision.
I must emphasize that, today, as you prepare to produce your first podcast with what you have, you do not need a fancy microphone. My first was a $7.95 headset/microphone combination from Labtec (http://labtec.com). Almost any microphone that you have in your home that will plug into your microphone jack will work. The same goes for headphones; as I stated earlier, I used a headphone/mic combo, but almost any headphone that will plug into your computers line out will work. So dig around and see what you have on hand.
Software
I have done my best to find software solutions that are free, but in some cases, this hasnt been possible. In the software reviews that follow, I have reviewed only software that I have used or that I know is being used in the world of podcasting today. If you dont want to purchase any software, you dont have to. Ive simply pointed you to software resources and given you guidelines to follow.
In this section, I will cover the software that you need for your computer, not what you will need on your website. That will be covered in detail in Chapter 10.
Heres what you need:
- Recording/editing software
- Audio conversion programs (optional)
- FTP program for file transfers
- Audio routing tools (for Mac only)
I will say this; there has been a lot of movement by developers to produce tools to make it simple for people to create podcasts. There are even developments by new companies, such as Odeo (http://odeo.com), to create a service that will allow you to listen, create, and distribute podcasts through tools built into a web browser. These solutions will require careful development. It is tough enough to get a quality recording on software residing on your computer, let alone a tool that will run in your browser.
The following software tools are tried-and-true and, without a reasonable doubt, will give you a quality recording. I will be keeping an eye on these new services as they roll out. You will want to stay informed of the latest developments by checking websites that have active forums like Podcast Alley (http://podcastalley.com) (or Podcasting News' forum - editor) and the earlier adopters/testers of these new services. A number of tech podcasters at http://techpodcasts.com are involved in testing some of these new tools, so you should make sure you check out their shows for the latest developments.
Recording Software
A wide variety of recording software packages are available on the market. I will review only the most popular choices. If you have a recording package you are familiar with then go ahead and use it. If not, pick one from the reviews in the following sections.
The following are critical features to look for in a recording package:
- Configurable bit rate
- Configurable sample rate
- Capability of saving to MP3 without using secondary applications
- Noise reduction utilities
- Audio amplification utilities
- Audio normalization utilities
Audacity for Windows, Mac, and GNU/Linux
Audacity is an audio editor and recorder. This software package is developed under open source and is free. Audacity is the editors choice application to be used with the Mac and Linux. You can find Audacity at http://audacity.sourceforge.net/. Podcasters worldwide are using Audacity with its full feature set. Figure 5-1 shows the basic interface for Audacity.
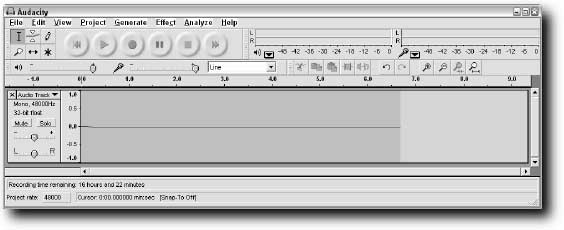
FIGURE 5-1: Audacity basic interface.
I have highlighted a few items from Audacitys long list of features that I feel are good for any recording software package. I have found these particular features to be key to producing and editing a podcast. The complete list can be viewed at http://audacity.sourceforge.net/about/features. The following information was derived from the Audacity website with permission under the Creative Commons License.
Audacity enables you to perform the following tasks:
- Record from microphone, line input, or other sources
- Dub over existing tracks to create multitrack recordings
- Monitor volume levels, using its level meters, before, during, and after recording
- Import and export WAV, AIFF, AU, and OGG Vorbis files
- Import MPEG audio (including MP2 and MP3 files)
- Export MP3s with the optional LAME encoder library
- Create WAV or AIFF files suitable for burning to CD
- Edit with cut, copy, paste, and delete
- Use unlimited undo (and redo) to go back any number of steps
- Rapidly edit large files
- Fade the volume up or down with the Envelope tool
- Remove static, hiss, hum, or other constant background noises
- Adjust volumes with compressor, amplify, and normalize effects
- Record at up to 96 kHz
- Mix tracks with different sample rates or formats, with Audacity converting them automatically in real time
- Load various sound enhancement and effects plug-ins
Other built-in effects include Echo, Phaser, Wahwah, and Reverse.
Audacity is licensed under the GNU General Public License (GPL) on Mac OSX,Windows, and GNU/Linux.
GNU is a License vehicle for open-source software. For more information, visit http://gnu.org/licenses/licenses.html#Intro.
The features I have listed will help you create a great podcast. Even though this list is not exhaustive, it shows you the diversity and power of an open-source program.
As with any open-source project, the developers, due to software patent concerns, had to be careful about which functionalities they included in the base code, especially when supporting the MP3 format.
To convert a recording to MP3 in Audacity, you need to install a software add-on called LAME. (LAME aint an MP3 encoder.) The projects name, which is actually represented in parentheses, seems to contradict what you think it should do. LAME was intended to be a MP3 educational tool, but it just so happens that a lot of audio recording programs use the program to convert many types of file formats to MP3. You will find the URL links to LAME and other recommended additional software add-ons via the respective operating system link on the Audacity download page (http://audacity.sourceforge.net/download/).
I will discuss many of these features as I get into the tutorials in Chapters 8 and 9.
Adobe Audition for Windows
Adobe Audition is a commercial recording and editing software program which you can find at http://adobe.com/products/audition/main.html, and retails for $299. Figure 5-2 shows the multi-track view of Adobe Audition.
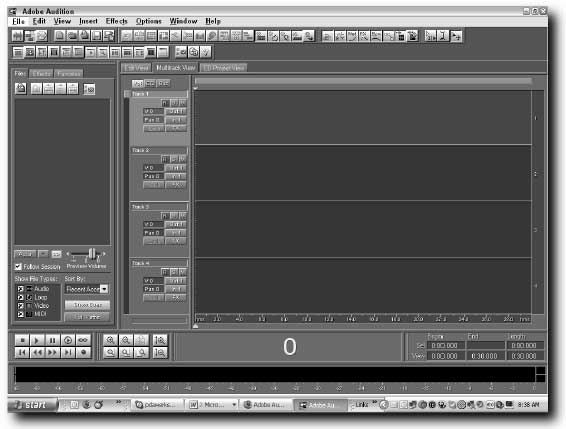
FIGURE 5-2: Adobe Auditionthe multitrack view.
I did my first podcast using Adobe Audition, partly because I already owned Audition. Audition is the editors pick for Windows users. The price may scare some of you, but it is worth every penny.
Adobe Audition is feature-packed but very simple to use. Audition has a large number of the audio conversion routines built in. This means that when you record, it does so in WAV format. When you save the file, you convert it to the file format you want to publishin my case, MP3.
Audition is great for those of you considering doing podcasts with multiple parties in separate locations. (In Chapter 7 we will talk about multiparty recordings.) Adobe, the creator of Audition, does offer a trial version. You can find the link to the tryout page on the Audition main page on Adobes website (referenced above).
Audition contains the following primary features:
- Audio effects and Digital Signal Processing (DSP) tools
- Multitrack mixing
- 5,000 royalty-free music loops
- Highly accurate editing tools
- Built-in sound effects tools
- Automatic click/pop reduction
Adobe Audition is well suited for those of you with some shows under your belt who want to do more fancy editing. I use it as my default application.
Audio Hijack Pro Mac
You can find Audio Hijack Pro at http://rogueamoeba.com/audiohijackpro/. They have a free trial period for the product, but there is a $32 registration fee if you continue using it. Figure 5-3 shows the Audio Hijack default startup screen.
Audio Hijack Pros purpose is to hijack audio streams from various applications on the desktop. The program has been adopted as the Mac podcasters best friend. RogueAmoeba, the parent company, has been proactive in meeting podcasters feature requests, and rumors are that they are making changes to make Audio Hijack more podcast-friendly.
Experienced Mac users will say that this application is not intended for podcasting, so why not use GarageBand? I agree that GarageBand brings to the table the same advanced features as Adobe Audition and Audacity, but for someone who has never experimented with audio before, GarageBand can be intimidating. Keeping podcasting on the KISS (Keep-it-Simple-Stupid) mentality is better, and Audio Hijack Pro is very simple to use.
Because Audio Hijack Pro will capture any kind of audio, it is much like a digital video recorded for audio. Many of us have listened to a streaming audio show and wished we had a tool that could capture the audio to listen to later. I like to listen to Coast to Coast AM (http://coasttocoastam.com/) with George Noory, which is a syndicated late-night talk show that explores supernatural and out-of-this-world topics. I subscribe to the streaming service, which until recently had no archive service; thus, there was no way to listen to shows later. Fortunately, within the last couple of years,Windows and Mac users have been offered similar tools to do the same thing. Audio Hijack Pro is the king of the hill and has hit a home run with this product.
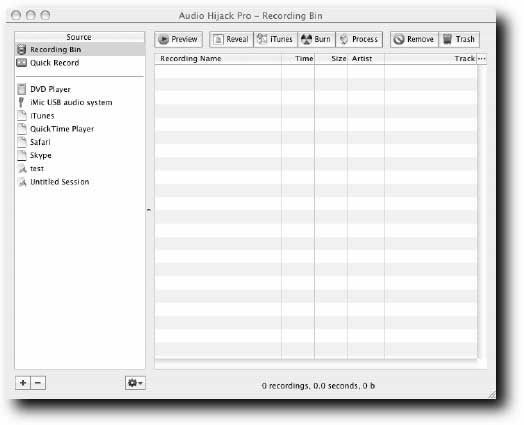
FIGURE 5-3: Audio Hijack Pro default startup screen.
I can capture any audio stream with Audio Hijack; thus, I have the perfect podcast recording tool. I can save in several different file formats, and if need be, I can load files to Audacity for editing. (Audio Hijack Pro is not an editor; it is only a recording software package.)
Additionally Audio Hijack Pro comes with a number of preloaded audio plug-ins so that you can apply filters and effects directly to the recorded stream.
Audio Hijack contains the following features:
- Nearly 50 audio effects plug-ins
- Gives you the ability to work with VST, Audio Unit, and LADSPA plug-ins
- 10-band equalizer
- Lets you create MP3, AIFF, AAC, or the Apple Lossless formats
- Gives you the ability to block system alerts and beeps
Table 5-1 Audio Plug-ins and Other Resources
|
| KVR Audio | Open Source VST, DX, AU | http://kvraudio.com/ |
| Audio Units | Mac OS X audio units | http://audio-units.com/ |
| LADSAP | LADSAP | http://adspa.org/ |
| MHC | VST and audio units | http://mhc.se/software/plugins/ |
| Sound Exchange | Multiple | http://sox.sourceforge.net/ |
Wiretap (Mac)
Some podcasters are having success with Wiretap (http://ambrosiasw.com/utilities/wiretap/), a record-only application for $19. Figure 5-4 shows Wiretap opened, along with its recording session window.
FIGURE 5-4: Wiretap and its recording session window.
Michael Butler of The Rock and Roll Geek Show came up with a recording recipe that works well with this application. You can see it at http://americanheartbreak.com/movabletype/archives/000160.html.
What I like about Wiretap is its ability to record by default everything going on inside the Mac. Using this application requires you to use Audacity to edit after you are finished recording. For those of you who want a quick-start application, this (or Audio Hijack Pro) is the way to go.
Podcast All-in-One Recording Solutions
I did my best to get into beta testing on some recording solutions that were being released at the time I was doing final wrap up on this chapter. A unique tool with great promise made it out in time to be includedMix Cast Live (www.mixcastlive.com). Figure 5-5 shows the control panel for Mix Cast Live 0.9.4.

FIGURE 5-5: Mixcast Live.
This application is very straightforward. It allows you to load all your audio clips to be played while you are recording your show, and has some tools built in so that you can do post-show editing. It does not have any plug-in support, but for the beginning podcaster, it is an easy-to-use recording program. After youre finished, it gets your file encoded and ready to upload to your web server.
Audio Conversion Applications
As we get into the actual recording process in later chapters and start listening to the quality of the MP3 files you create, you may not be happy with the way your program encoded the file. It is always best, when getting started, to save the initial recordings you make in a high-quality lossless formatWAV for PC/Mac or M4A for the Mac.
Once you have saved in lossless format, you can save a file to MP3 format and check its quality. The only complaints Ive heard about conversion are from individuals using Audacity and the LAME converter. You will most likely not need an audio conversion program at all if you use any of the other applications I have reviewed to this point. Audio converters would only be used if you decided to save your recording in a lossless format upon completion of all postproduction editing.
I have tried a number of encoders, from the commercial-licensed encoder in Audition to LAME in Audacity, and have found little difference. Audacity and Audition allow you to store your recordings in WAV format. This gives you the opportunity to convert, using the audio conversion tool of your choice, a WAV file to MP3 or any other format.
I do like Razor Lame, a Windows graphical interface front end to LAME. This tool gives you more control over the conversion of WAV files to MP3 than what you normally would have using the direct Audacity interface (http://dors.de/razorlame/index.php). Razor Lame is fast and allows you to set encoding variables that you cant in Audacity.
Table 5-2 shows a list of resources for audio conversion applications.
Table 5-2 Audio Conversion Directories
|
| Tucows | Windows | http://tucows.com/audiocon95_default.html |
| Tucows | Linux | http://linux.tucows.com/audioconversion_default.html |
| Tucows | Mac | http://mac.tucows.com/converters_default.html |
| Shareware.com | Multiple | http://shareware.com/ |
| Razor Lame | Windows | http://dors.de/razorlame/index.php |
FTP Clients
Once your podcast is complete, you will need a file transfer protocol (FTP) utility to upload your podcast to your web host. Many people use Internet Explorer to download files from FTP sites, but I have personally never used this built-in functionality.
I have not used Internet Explorer version 6 for some time, because of security concerns.
Due to the fact that you will be uploading your audio file to a website, you want a robust FTP program that is capable of error checking to ensure that the file transferred is an exact copy of what is on your hard drive.
I cover transferring the file to your web server in detail in Chapter 13. Most of you will probably be familiar with FTP and may have a client on your desktop already. For those that have not been initiated, an FTP program simply moves a file on your computer to the file directory of your web host, where it can be accessed by the public.
It should be noted that there are literally a hundred or more FTP clients available.Table 5-3 lists sites from which you can download an FTP client.
Table 5-3 FTP Client Directory
|
| Tucows | Windows | http://tucows.com/networkadministration_ftp_default.html |
| Tucows | Mac | http://mac.tucows.com/networkprot_ftp_default.html |
| Tucows | Linux | http://linux.tucows.com/ftp_default.html |
WS_FTP Pro (Windows)
For a number of years, I have used WS_FTP Professional. It can be found at http://www.ipswitch.com/Products/WS_FTP/ com/Products/WS_FTP/ for $49.95. (Many of the FTP programs that you will find on the resource list are free.) In Figure 5-6 you can see what the application looks like when logged into a web server.
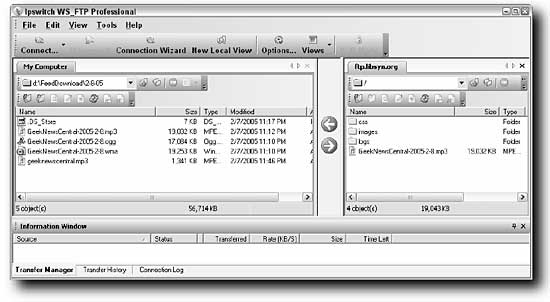
FIGURE 5-6: WS-FTP professional basic operating page.
Because there are so many FTP clients out there, you have a wide selection of choices both free and commercial to choose from. Here are some basic features you should look for:
- Auto reconnect: The client will reconnect when it loses a connection with your host.
- Auto retry: The client will continue to try and connect after failure to connect to your host.
- Auto resume: The client will resume where it left off if your connection is interrupted during a file transfer.
Captain FTP (Mac OS X)
The Mac operating system has an equally high number of FTP clients available. I particularly like Captain FTP version 4.0, which is feature-rich. You can find Captain FTP at http://www.captainftp.com/ http://www.captainftp.com/. The program is free for trial for 15 days, but it does require a registration of $34. Figure 5-7 shows Captain FTP in default startup mode.
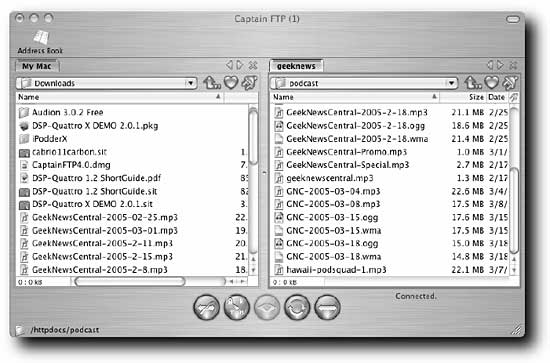
FIGURE 5-7: Captain FTP.
Captain FTP has all the primary features that a good FTP program needs. Having tested six or seven Mac applications for price versus features, I have to say that this program is on the right track, and I highly recommend it.
Some other popular Mac FTP programs include Fetch (http://fetchsoftworks.com), for $25, and Transmit3 (http://panic.com) for $29.95.
FTP Clients for Linux
The built-in FTP client native with Linux is a great application and should serve the purpose. I will not even insult Linux users with a description of the best application to use, as the majority of Linux users are power users to begin with.
Media Players
You will find as you create podcasts that you will need an audio player to organize introductions, audio clips, or any bumper music you may have.
Windows users may want to use an MP3 player with a lower memory requirement. I have found that Winamp works very well and does not impact the audio recorder software. You can find Winamp at http://winamp.com/. The best part is that its free.
You will find that some media players are much more capable and thus, typically require more computer RAM and consume more processor resources. For those of you with machines with a smaller amount of RAM, this can be a concern because recording audio is processor- and RAM-intensive. So, it is important that you use a media player that is simply a media player, without a lot of excessive features that could rob valuable processor and RAM resources.
Mac users will want to stick to the old faithful: iTunes. I tested a number of media players and was not able to find anything better for podcasting than the standard installed iTunes.
If you have large libraries loaded in iTunes, you might see a performance drag on the system while it is loading and switching play lists. Make sure you have all your extra audio clips set up and ready before you hit Play.
Because I am not a Linux guru and do not claim to be, I point any Linux users to the Tucows directory (http://tucows.com/.) You will want to pick a media player that does not use a lot of system resources and has a play list capability.
Mac Specialty Applications
The Mac requires some special applications for you to be able to pass audio to other applications. Audio Hijack Pro does a good job without having to use the following applications. But those who decide that they will be using Audacity to record podcast will indeed need SoundFlower and SoundFlowerBed.
Mac is configured differently than a PC, and it is not as easy to capture audio you may want at the same time you produce your podcast. Using Audacity without the following applications will make it impossible to insert audio clips from iTunes into the recording live. You can splice them in later, but that is extra work. The following applications act as a big switchboard and allow you to route all audio into the recording application.
SoundFlower and SoundFlowerBed
SoundFlower and SoundFlowerBed can be downloaded via http://cycling74.com/products/soundflower.html products/soundflower.html.
SoundFlower is an extension for Mac OS X (10.2 and later). Once installed, SoundFlower presents itself as an audio device. Therefore, any audio application can send and receive audio. SoundFlower is free and open source.
Some of you may have a hard time understanding this concept, so I want to give an alternate description: In order for music or other audio you play in iTunes to be recorded into Audacity along with your voice, you need an application to link the two applications.
iTunes does not allow you to choose an audio output device. It defaults its output to the default setting in the Audio Configurations settings. Thus, if you want to record what is being played on iTunes in Audacity, there is no way to capture that audio. By going in and setting the default audio output to the two-channel selection for SoundFlower, you can, in a sense, route the audio. Think of SoundFlower as an audio patch panel.
SoundFlowerBed is useful when you are trying to send audio to and from an application but cannot send it through audio monitor devices. SoundFlowerBed is part of SunFlower and can be accessed from the Finders menu bar.When using it, you can access any SunFlower channels and direct them through an audio device.
When you have SoundFlower set as the primary audio output device, you may not be able to physically hear what iTunes is playing and what Audacity is recording, so you use SoundFlowerBed to tap into the SoundFlower channel.
Many people have had a hard time getting their heads wrapped around these two utilities. Please visit their home pages for more information.
A very good reference on using these two tools can be found at http://macdevcenter.com/pub/a/mac/2005/01/25/podcast.html com/pub/a/mac/2005/01/25/podcast.html. You can always ask for help directly from the podcasters via a mailing list, which you can sign up for at http://groups.yahoo.com/group/podcasters/ group/podcasters/.
Line In
This is the final application that you will need for Mac OS X. It is free and can be found at http://rogueamoeba.com/freebies.com/.
This application for OS X enables the playing of audio from input devices through the output, which will allow you to have a headset feedback loop. This feature was available in OS 9s Play input through output device option.
Summary
You are one step closer to putting all the pieces together. In this chapter, I covered the minimum hardware and software you will need for podcasting and gave you some choices for both. As you move towards turning on the microphone and saying, Welcome to my podcast, I have armed you with information that you can use to load up your PC with the necessary software tools.
Mac users will need at least a Mac Mini, although I am sure there are Mac users out there who will be able to create a podcast on older models. Through my testing, I discovered that a Mac Mini is more than capable of creating a podcast. Those of you using Windows will need to realize that using a $399 special may require that you add some RAM or make sure you have minimized the number of applications running on the taskbar.Typically, though, you will be safe with a PC with a Pentium 4 or equivalent processor with 512 MB of RAM, 3 to 4 GB of available space on your hard drive, and an audio port for line in and line out.
In addition, you will need recording/editing software, along with an FTP client and a media player. Mac users may need SunFlower, SunFlowerBed, and line in as well.
This chapter has provided URLs and resources for finding the software.To continue on the way towards joining the podcasting revolution, you need to
- Download and install the software that you feel best fits your plans
- Test, evaluate, and purchase any of the software tools that you may need
In Chapter 6, I will review hardware that you can use to transform your basic podcast setup into a semi-professional studio.
« Back
|